Showing posts with label Freeware. Show all posts

Pocket Killbox – Process & File remover

Pocket Killbox from Option^Explicit Software Solutions is a good Process & File Killer. The developer offers this nice utility as a freeware product and recommends: Use Killbox, When asking nicely doesn't work.

Pocket Killbox

You can type full path of file/folder to delete or you can browse for its path by clicking Browse for file button. Clicking Show file properties button shows properties of chosen file/folder, and Delete filebutton informs Killbox to delete selected file/folder. Killbox offers you following 3 options for removing the file/folder.

  • Standard File Kill
  • Delete on Reboot
  • Replace on Reboot

First 2 options are obvious; the 3rd option allows you to replace the selected file with a dummy file, if you don’t want to name the file replacing the file being deleted. In the following example, we want to replace C:\DeleteMe\garbage with C:\Clean\good file.

Pocket Killbox

Clicking 4button inform you that changes will be made after reboot, and prompts you to reboot the computer.

Changes will be made after Reboot, Reboot Now?

If you are unsure about file name and location, Killbox offers you file search also. Press Ctrl-F key sequence or click on Tools > File Find. Now type something to search and press Enter key or click on File Find button.

Type something to search for

Killbox searches your computer hard disk and displays full path to the file/folder.

Full path of file to delete

Before deleting file/folder, Killbox takes its backup in !KillBox folder in root of your hard disk.

Following options offers more control over file/folder deletion process.

  • End Explorer Shell While Killing File
  • Unregister .dll before Deleting

If you choose to end Explorer Shell (explorer.exe), you can start the same by clicking on Tools > Start Explorer Shell.

The Tools menu has also few other useful items.

  • Delete Temp Files
    Allows you to delete temporary Internet files, temp files, cookies, Dr. Watson dumps, prefetch files, recent document list, history, Sun Java cache, etc. for user profiles found in the computer.
  • Go to SessionManager
    Launches Registry Editor and open HKEY_LOCAL_MACHINE\SYSTEM\CurrentControlSet\Control\Session Manager key
  • Open Wininit.ini
  • Hosts file
    Launches Notepad and opens %systemroot%\system32\drivers\etc\hosts file which contains mapping of IP addresses to corresponding host names

  • Open Services
    Launches Services applet, i.e., %SystemRoot%\system32\services.msc

Clicking on Processes >> menu item expands Killbox GUI to show you list of running processes.

Pocket Killbox

To end a running process, select checkbox before the executable name and click on End Task button.

Overall, Killbox is very useful in removing persistent file, and killing running processes.

Mouse and Keyboard sharing with Synergy

Synergy is an open source software, which allows you to easily share a single mouse and keyboard between multiple computers with different operating systems, each with its own display, without special hardware. It's intended for users with multiple computers on their desk since each system uses its own monitors.

Redirecting the mouse and keyboard is as simple as moving the mouse off the edge of your screen. Synergy also merges the clipboards of all the systems into one, allowing cut-and-paste between systems. Furthermore, it synchronizes screensavers so they all start and stop together and, if screen locking is enabled, only one screen requires a password to unlock them all. Machines running following operating systems and TCP/IP networking are supported.

  • Microsoft Windows 95/98/Me/NT/2000/XP
  • Mac OS X 10.2 or higher
  • Unix including Linux, Solaris, and other variants running X- Windows version 11 revision 4 or higher

Synergy unifies display of all the computers on your desktop to form a single virtual screen. You use the mouse and keyboard attached with only one of the computers while you use all of the computer monitors. Once you configure Synergy about how many screens you have and their relative positions, and move mouse off the edge of a screen, it jumps instantly to the neighboring screen. The keyboard input is fed to screen with mouse focus. Synergy can also handle multiple screens attached to the same computer.

Furthermore, it builds a single clipboard to make cut-copy-paste functions work across all the computers. It even converts newlines (CR-LF sequence) to each computer's native format so cut and paste between different operating systems works seamlessly.

Synergy also ensures that screensavers on all computers start/stop simultaneously.

Running Synergy is a 3 step process.

  1. Choose a server
  2. Install the software
  3. Configure and start the server

Step 1 - Choose a server

The first step is to choose which keyboard and mouse you want to share. The computer with that keyboard and mouse is called the "primary screen" and it runs the Synergy server. All of the other computers are "secondary screens" and run the Synergy client.

Step 2 - Install the software

Second, you need to install the software on all the computers that will share the mouse and keyboard. 

Step 3 - Configure and start the server

Next, you need to configure Synergy with primary and secondary screens names, their relative positions, and other options. After installing Synergy on all the computers, click on Start > Programs > Synergy > Synergy on server computer, i.e., computer with keyboard and mouse attached with it.

1

Select Share this computer’s keyboard and mouse (server) option and click on Configure button.

2

Click on + button to add the server to the screens list and click on OK button. Use the + button to add other computers. Use controls under Links to connect screens together.

  • Click on the server's name in the Screens list
  • Choose the screen to the left of the server; use --- if there is no screen to the left of the server.
  • Similarly choose the screens to the right, above and below the server.
  • Repeat these steps for all the other screens.

Click OK to close the Screens & Links dialog.

Now click on Test button. It will start the server and you will see a console window with scrolling log messages informing you about Synergy's progress. If any error occurs you'll be intimated. Some errors are documented below.

Failed to open screen (X11 only)

  Hint: Check permission to open the X display
Address already in use
  Hint: Another program or another copy of Synergy is using the synergy port; stop the other program or choose a different port in the Advanced... dialog. In case you select different port, configure all clients accordingly.
Connection forcefully rejected
  Hint: Check Synergy is running on the server and no firewall is blocking the server or Synergy port.
Already connected
  Hint: Check that the Synergy client isn't already running.
Refused client
  Hint: Add the client to the server's configuration file.

Connection timed out


Hint: Check that server-host-name is correct and no firewall is blocking the server or Synergy port.

Connection failed


Hint: Check that server-host-name is correct.

Read the errors to determine the problem then correct them and click on Test button again. Once everything works fine, stop all the clients then the server. Then start the server and all the clients.

Synergy is a boon for those who work with multiple computers on their desktop.

Trend Micro HijackThis – Hijack detection tool for Windows

HijackThis from Trend Micro is a free hijack detection tool that scans your Windows PC for Browser Helper Objects (BHOs), autorun programs, Windows Explorer context menu objects, hosts file etc. and generates a log file.

1

Scan results are displayed one line per entry. 

2

Each entry is preceded with a checkbox and a group code. HijackThis v2.0.2 defines different sections of hijacking possibilities into following groups.

R - Registry, StartPage/SearchPage changes
    R0 - Changed registry value
    R1 - Created registry value
    R2 - Created registry key
    R3 - Created extra registry value where only one should be
F - IniFiles, autoloading entries
    F0 - Changed inifile value
    F1 - Created inifile value
    F2 - Changed inifile value, mapped to Registry
    F3 - Created inifile value, mapped to Registry
N - Netscape/Mozilla StartPage/SearchPage changes
    N1 - Change in prefs.js of Netscape 4.x
    N2 - Change in prefs.js of Netscape 6
    N3 - Change in prefs.js of Netscape 7
    N4 - Change in prefs.js of Mozilla
O - Other, several sections which represent:
    O1 - Hijack of auto.search.msn.com with Hosts file
    O2 - Enumeration of existing MSIE BHO's
    O3 - Enumeration of existing MSIE toolbars
    O4 - Enumeration of suspicious autoloading Registry entries
    O5 - Blocking of loading Internet Options in Control Panel
    O6 - Disabling of 'Internet Options' Main tab with Policies
    O7 - Disabling of Regedit with Policies
    O8 - Extra MSIE context menu items
    O9 - Extra 'Tools' menuitems and buttons
    O10 - Breaking of Internet access by New.Net or WebHancer
    O11 - Extra options in MSIE 'Advanced' settings tab
    O12 - MSIE plugins for file extensions or MIME types
    O13 - Hijack of default URL prefixes
    O14 - Changing of IERESET.INF
    O15 - Trusted Zone Autoadd
    O16 - Download Program Files item
    O17 - Domain hijack
    O18 - Enumeration of existing protocols and filters
    O19 - User stylesheet hijack
    O20 - AppInit_DLLs autorun Registry value, Winlogon Notify Registry keys
    O21 - ShellServiceObjectDelayLoad (SSODL) autorun Registry key
    O22 - SharedTaskScheduler autorun Registry key
    O23 - Enumeration of NT Services
    O24 - Enumeration of ActiveX Desktop Components

Detailed information about an entry can be obtained by selecting it from the list of found items or highlighting the relevant line, and clicking Info on selected item. You can select an entry and click on Fix checked button. Though HijackThis backups any changes made to the system and allows you to restore backup in case the things don’t work it is still advisable that before fixing any entry, make sure that you have taken backup of Windows registry. You can see the backups created by HijackThis by clicking the View the list of backups button in Main menu.

4

Apart from scanning of several kinds of hijacking possibilities, HijackThis also offers some useful tools. To access these tools click the Open the Misc Tools section button in Main menu.

5

There are following 6 useful tools:

  1. Process manager
  2. Hosts file manager
  3. Tool to delete a file on reboot
  4. Tools to delete an NT service
  5. Tool to scan for alternate data stream
  6. Uninstall manager

The Process manager lists all running process with their Process Identifier (PID) and full path to the corresponding file.

6

The hosts file which contains mapping of IP addresses to host names, is located in %systemroot%\system32\drivers\etc folder in Windows XP. The Hosts file manager open the hosts file and allows you to delete IP address mapping or open hosts file for editing in Notepad.

7

Uninstall manager extends functionality of standard Add or Remove Program Control Panel applet. You can delete/edit uninstall entries, however restoration of deleted entry is not possible.

8

COMODO Internet Security, a must have security program for your Windows PC

Comodo Internet Security (CIS) from Comodo Security Solutions Inc. provides complete threat protection by combining
  • A powerful antivirus software that automatically detects and eliminates viruses, Worms and Trojan horses;
  • An enterprise class packet filtering firewall that constantly defends your computer from inbound and outbound internet attacks; and
  • A rule-based intrusion prevention system called Defense+ that protects your critical operating system files from malicious processes, internal attacks and blocks unknown malware.
When used individually, each of the above mentioned product delivers superior protection against its specific threat challenge. When used together as a full suite they provide a complete security system for your Windows PC.

Let’s download a copy of CIS setup from http://personalfirewall.comodo.com/download_firewall.html and start CIS installation.
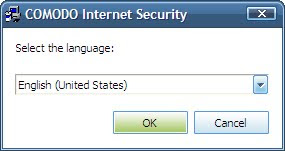


Click on OK button.


Click on Next button.


Go through the License Agreement and click on I accept button.


Choose the destination folder and click on Next button.


Enter your email address to receive product updates, PC security tips, and click on Next button.


Check on Install COMODO Antivirus, Install COMODO Firewall and click on Next button.


Choose your option to join or skip ThreatCast community, and click on Next button.


Check on Install COMODO Hopsurf Toolbar, if you want to integrate the COMODO recommended way to protect your favourite browser. Click on Next button.


COMODO Secure DNS is another recommended service that is provided free of cost. Click on Next button.


Click on Finish button to allow CIS setup activate product license.


Click on Finish button to restart the computer. After restarting the computer, CIS detects a new private network.


You may assign a name to this network. However, the CIS assigned name is OK. Click on OK button.

Open COMODO Internet Security Start menu subgroup and launch COMODO Internet Security.


CIS has a nice and user-friendly interface to work with. We have not updated the virus signature database, yet. But before that have a look at the functionality of the CIS. Click on the ANTIVIRUS button in top command bar.


Click on Scanner Settings button.
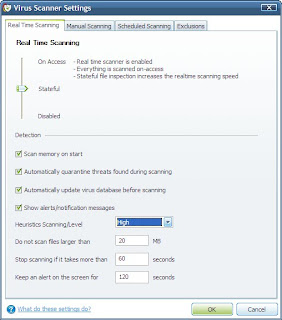


Set options for Real Time Scanning and click on Manual Scanning tab.


Set options for Manual Scanning and click on Scheduled Scanning tab.


Set options for Scheduled Scanning and click on Exclusions tab.


Click on OK button to close Virus Scanner Settings window. Click on FIREWALL button.


Click on Stealth Ports Wizard button. The wizard is used to create invisible ports for your network. You have 3 options to define stealth ports. You can define new trusted network, you can set CIS to alert you for every incoming connection on per-case basis or you can block all incoming connection to your computer.


Suppose we want to define trusted network. Click on Next button.


Select you network zone and click on Finish button.


Click on OK button. Now click on View Active Connections button. The Active Connections interface contains summary of all currently active connections on a per-application basis. This list is updated in real time whenever an application creates a new connection or drops an existing connection. You can view all the connected applications, source, destination, and total amount of traffic that has passed in and out of your system over each connection.


Click on Close button. Click on My Port Sets button. A number of standard ports are listed on functionality basis. You can add your application ports, edit or remove existing ports.


Once you are done defining your set of ports, click on Apply button. Click on My Network Zones button.


Click on Apply button to go back to Firewall management interface. Click on My Blocked Network Zones button.


By default there are no blocked network zones. You may add network zones, with which you want to avoid any packet interchange. Click on Cancel button. Click on DEFENSE+ button to see interface for host intrusion prevention system module.
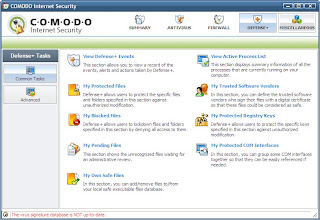


Click on View Active Process List button.


This shows all processes running in your system with their hierarchy in process tree, process identifier, module developer's name, and user account name. Click on Close button. Then click on My Trusted Software Vendors button.


Click on Cancel button. Then click on My Protected Registry Keys button.


This displays all Windows Registry keys protected by CIS. You can add/edit/remove/group registry keys for better protection to suit your security requirements. Likewise clicking on My Protected COM Interfaces shows you which COM (Component Object Model) interfaces have been secured by CIS.


This was a general walkthrough of Comodo Internet Security installation and features. CIS is an industrial grade security product delivered free of cost. Highly recommended to be installed on your Windows PC.